Tiny House Construction projects often cost about $34,000–$35,000 when a homeowner manages labor and buys materials directly.
That figure surprises many and shows how a clear plan can control budget and timeline. The guide will map the full process from design and foundation to framing, weatherproofing, systems, insulation, and finishes.
Right-size tools and accurate measurements save time and reduce rework. Core gear includes drills, circular saws, levels, finish nailers, and proper PPE, while common materials feature OSB, house wrap, flashing tape, metal roofing, R13 fiberglass, PEX, and a 100-amp panel.
Readers will see a concise checklist of tools and a sensible sequence of steps that protect space efficiency, weight limits, and code compliance. For a quick tool primer, explore an essential tool list here.
Key Takeaways
- Start by aligning scope, budget, and lifestyle to guide every decision.
- Follow a clear sequence: plan, prepare foundation, frame, weatherproof, rough-in systems, insulate, and finish.
- Right tools and accurate measuring reduce time and improve build quality.
- Common materials like house wrap and flashing tape extend durability.
- Self-managed builds often land near $34K–$35K with smart purchasing.
Tiny House Construction: What This How-To Guide Covers
Build tiny house projects need a clear order of operations. This guide shows a practical, step-by-step path from initial concept to move-in. It helps DIYers judge time, cost, and when to hire a pro.
Search Intent And Who This Guide Helps
The resource clarifies search intent by laying out the main steps and the overall process. It suits first-time builders, budget-conscious owners, and planners weighing DIY versus subcontracting.
How To Use This Step-By-Step Resource
Follow the ordered checklist so tasks don’t conflict and inspections stay straightforward. Gather plans, tools, PPE, and material lists up front to save time and reduce rework.
- What it covers: planning, trailer or foundation prep, framing, weatherproofing, systems, insulation, and finishes.
- Track progress: simple checklists that match build phases and cut mistakes.
- Safety and quality: checkpoints guide when to call licensed pros for electrical, plumbing, or roofing.
“A clear plan reduces surprises and keeps each phase focused on durable, code-minded results.”
For a detailed DIY primer and next steps, see a complete how-to resource — how-to build a tiny home.
Tiny House Construction Planning And Design Fundamentals
A successful plan starts when the owner defines lifestyle needs and how the space will be used. This step keeps layout choices focused and avoids costly rework.
Defining Lifestyle, Occupants, Pets, And Daily Use
They should note occupant count, pets, remote work, and hobbies. Documenting the daily routine clarifies storage and furniture needs.
Off-grid options change plumbing and power design. Climate influences insulation and roof choices early in planning.
Stationary Foundation Vs Trailer: Mobility, Cost, And Codes
A trailer offers mobility but must meet tow width and height limits. A foundation feels permanent and often needs permits and hookups.
Size, Layout, And Space Optimization From 20 To 28+ Feet
Common lengths: 20 feet for solo use, 24 feet for couples, and 28+ feet for families. Longer lengths add privacy and storage but raise towing and permit needs.
- Use lofts, fold-down tables, and under-stair storage to maximize usable space.
- Balance weight by selecting appropriate framing like 2×4 or light steel; match rafters and wall sizes to loads.
- Pick durable exterior materials—engineered siding and metal roof—to lower lifetime upkeep.
| Length (ft) | Best For | Key Tradeoffs |
|---|---|---|
| 20 | Solo living | Easy towing, limited storage |
| 24 | Couples | Balance of comfort and towability |
| 28+ | Small families | More space, higher weight and permit needs |
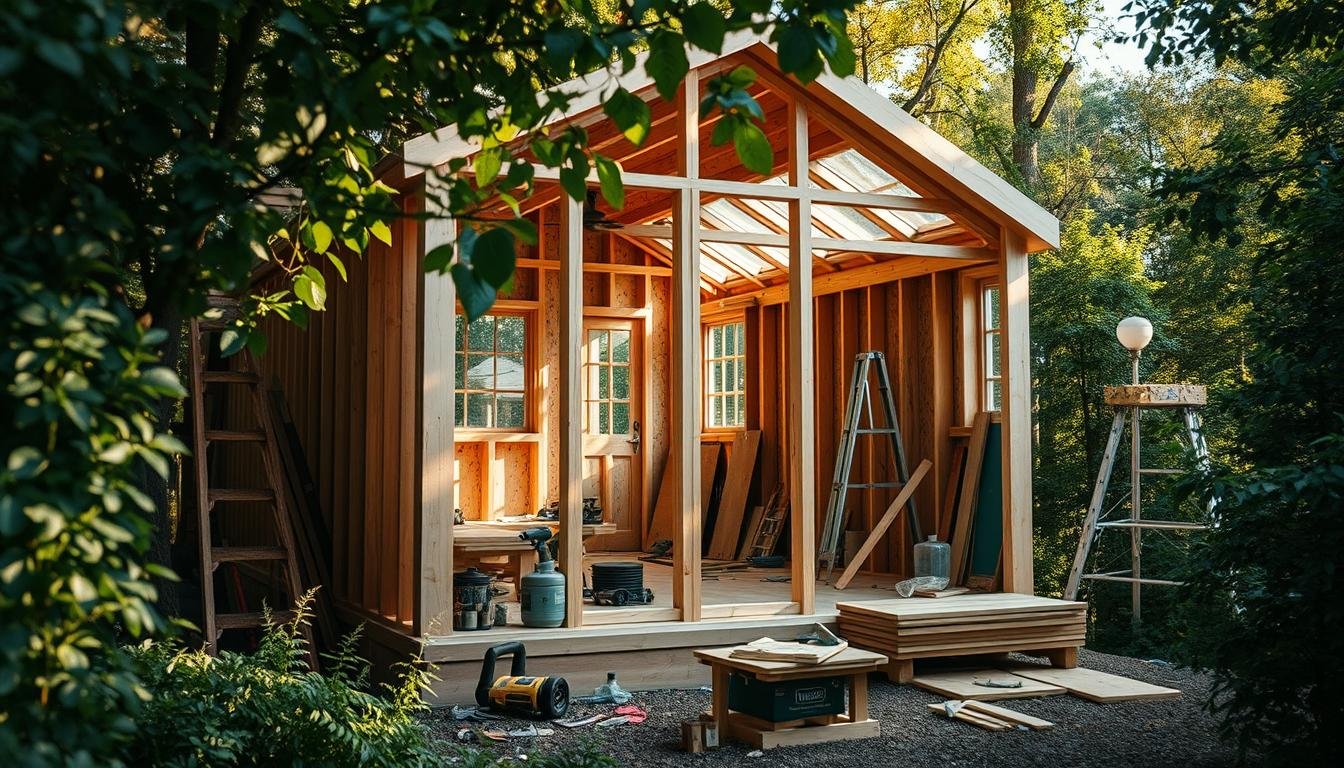
Essential Tools, Safety Gear, And Shop Setup
Proper tools and a staged workspace keep the team moving in the correct order and save time. This sets the tone for an efficient build process and a safer worksite.
Core Power Tools: Saws, Drills, Nailers, And Levels
At minimum, equip a circular saw, miter saw, drill/driver, finish nailer, and a laser level. These cover most framing, trim, and layout tasks.
Include a caulk gun for adhesives and a chalk line for straight runs. Laser levels and spirit levels speed alignment and reduce guesswork.
Fasteners, Adhesives, And Measuring Tools For Precision
Stock construction adhesive, flashing tape, and corrosion-resistant screws for exterior assemblies. These materials extend lifespan when wood meets metal or wet areas are present.
Accurate measurement tools — tape, square, and calipers — improve fit. Confirm square and plumb often so the structure stays true and ready for finishes.
Safety First: PPE, Ladders, Ventilation, And Fire Safety
Adopt PPE early: eye protection, hearing protection, dust masks or respirators, and gloves. Ladder safety and adequate ventilation cut accident risk.
Keep a clear, well-lit shop with stable work surfaces. Stage tools by step so the right gear is at hand and the build process flows without wasted time.
Trailer Selection, Preparation, And Weight Management
Choosing the right trailer sets the foundation for a safe, towable build and keeps later steps predictable. Early decisions shape axle needs, deck layout, and how the finished weight distributes across the frame.

Choosing New, Used, Or Custom Trailers And Axle Ratings
Options include used equipment trailers, new or custom frames, or salvaged travel trailers. Pick axles that exceed the projected finished weight — for example, dual 7,200-lb axles for heavier builds.
Rust Removal, Priming, And Frame Squareness Checks
Inspect the frame for corrosion. Remove rust with grinders and wire brushes, then apply a rusty-metal primer and quality paint to extend service life.
Confirm frame squareness before sheathing. Add cross supports or shims so walls set true and exterior panels align without stress.
Load Limits, Balance, And Weight Distribution Over Axles
Plan tongue weight and balance heavy items over or slightly forward of the axles to improve tow stability. Consider wheel-well geometry and low-rider frames to simplify insulating and fastening the subfloor.
- Evaluate trailer by axle rating, frame condition, cost, and customization options.
- Prime and paint after rust remediation to resist corrosion.
- Document feet and area constraints for legal towing and safe transport.
| Trailer Type | Typical Axle Rating | Pros | Notes |
|---|---|---|---|
| New/Custom Frame | Dual 7,200–8,000 lb | Custom deck, precise axle placement | Best for higher finished weight and long-term building |
| Used Equipment Trailer | 3,500–7,200 lb per axle | Lower cost, quick availability | Inspect frame; upgrade axles if needed |
| Salvaged Travel Trailer | Varies — often lower ratings | Built-in tongue and wiring | Useful for light-area builds; check corrosion |
Foundation And Subfloor: Materials, Vapor Barriers, And Insulation
A well-built subfloor starts with the right panels, adhesives, and attention to vapor control. This step ties the trailer frame to a rigid platform that resists moisture and movement. Use 3/4-in tongue-and-groove OSB or plywood, applied with construction adhesive and screws for long-term stiffness.
OSB Or Plywood Subfloor, Construction Adhesive, And Screws
Glue panels to the framed base and fasten with corrosion-resistant screws. Pre-mark stud and joist locations on the floor so wall layout stays accurate. Add blocking under heavy fixtures to reduce deflection and noise.
Spray Foam, EPS Panels, And Underbody Flashing
Install a continuous vapor barrier under the subfloor and seal penetrations to limit water migration. Fit EPS panels between cross-members and seal gaps with spray foam to improve insulation continuity.
- Protect the underside: add galvanized metal flashing to shield insulation from road debris and moisture.
- Layered EPS: stack panels for higher R-values and a stiffer floor assembly used in many example builds.
- Verify connections: confirm structure alignment and fasten frame points with appropriate screws and bolts.
| Component | Recommended Spec | Benefit |
|---|---|---|
| Subfloor Panels | 3/4″ T&G OSB or Plywood | Stiff platform, easy join at seams |
| Insulation | Layered EPS Panels | High R-value, fits between members |
| Sealing | Vapor Barrier + Spray Foam | Prevents water, improves continuity |
| Underbody | Galvanized Metal Flashing | Protects from moisture and debris |
Framing The Walls And Loft: Lumber, Layout, And Fastening
Starting with flat-built panels makes raising and squaring walls faster and safer. Assemble each wall on the floor so studs align and headers sit true before lifting. Pre-mark stud spacing to match insulation widths and cut boards and plywood in advance to reduce on-site waste.

Stud Spacing, Double Top Plates, And King Studs
Place studs at regular spacing to suit wall loads and sheathing. Use king studs beside openings and add a double top plate for racking resistance.
Headers, Openings, And Squaring Techniques
Size headers to carry loads over window and door openings. Fasten the frame with structural screws or lag bolts and check squareness often. Brace walls temporarily and verify plumb before sheathing.
Loft Framing, Hangers, And Structural Connections
Frame lofts using hangers and properly sized lumber so loads transfer directly to supporting members and the trailer frame. Align loft supports over studs or beams and reinforce connections with screws and approved hardware.
- Tip: Choose lumber grades that balance weight and stiffness for efficiency.
- Pre-cut plywood sheathing to speed installation on a compact jobsite.
Roof Structure, Rafters, And Sheathing
A well-sized ridge beam and correctly spaced rafters make the roof act as one stiff unit under load. This reduces deflection and helps the entire frame resist wind and snow without adding unnecessary weight.
Ridge Beam, Rafter Sizing, And Snow Load Considerations
Size the ridge beam and rafters to local code loads. Use span tables or an engineer for heavy snow zones so the roof stays stiff but light in weight.
Tie rafters to top plates with metal hangers or hurricane ties. These connectors resist uplift during travel and wind events.
OSB/Plywood Sheathing, Fascia, And Blocking
Sheath the roof with 1/2-in OSB or plywood and nail to rafter spacing recommended by the panel maker. Add blocking under fascia for a firm edge and clean lines.
Prepare the substrate for metal panels: solid blocking, consistent nail spacing, and recommended fasteners reduce oil-canning and leaks. Design modest overhangs and drip edges to protect siding and windows while remaining road-legal for a trailer build.
- Choose rafter sizes using local load criteria to balance stiffness and weight.
- Use metal connectors to lock rafters to walls and resist uplift and racking.
- Sheath with 1/2″ panels and add fascia and blocking for edge strength.
- Prep for metal roofing with a solid substrate and approved fasteners.
- Integrate ceiling height and insulation depth so foam or batt fits the cavity and thermal goals are met.
| Component | Spec | Benefit |
|---|---|---|
| Ridge Beam | Sized per span & load (engineer/span table) | Central spine; controls deflection |
| Rafters | Sized to snow/wind, spaced 16″ or 24″ o.c. | Stiff roof without excess weight |
| Sheathing | 1/2″ OSB or plywood | Firm deck for metal panels |
| Edge Details | Blocking + fascia + drip edge | Clean finish and water control |
Tip: Keep the structure square from ridge to plate so panels align and flashing seals at windows and openings. For a practical framing walkthrough, consult a detailed roof-framing guide or a trailer-specific step-by-step resource like the framing primer at framing the roof and the trailer roofing guide at building on a trailer.
Weatherproofing, Metal Roofing, And Siding Options
A tight building envelope starts with good flashing and thoughtful cladding choices that shed water and breathe. This step protects the wall assembly and roof deck while preserving interior finishes. Follow a clear sequence so roofing and siding integrate with window and door flashing for a durable result.

House Wrap, Flashing Tape, Drip Edge, And Ridge Caps
Apply house wrap with shingle-style overlaps to direct water outward and protect the wall from moisture. Use flashing tape around windows, doors, and penetrations to seal vulnerable joints. Leave the bottom of the window flashing untaped when using a rainscreen so any water can drain.
Install the roof with an ice-and-water shield at eaves, a drip edge at rakes, and a continuous ridge cap. Foam closures fill gaps at the ridge and eave to stop wind-driven water. These details make the roof shed water reliably while keeping rafters and plywood dry.
Engineered Siding, Cedar, And Corrugated Metal Choices
Select siding based on durability, maintenance, and look. Engineered siding panels reduce seams and stay straight on small elevations. Cedar boards offer warmth and natural resistance when sealed properly.
Corrugated metal siding or roofing provides a low-maintenance metal option and pairs well with corrosion-resistant fasteners. Pre-cut panels and boards before installation to minimize field seams. Respect ventilation paths behind cladding to manage moisture and extend material life.
- Key Steps: wrap, tape penetrations, install underlayment, then finish with siding and ridge cap.
- Pre-cut panels to reduce seams and keep lines clean on compact wall areas.
- Sequence work so window flashing, roof edge, and siding tie together for a tight envelope.
Windows And Doors: Openings, Flashing, And Installation
Accurate framing and deliberate shimming prevent glass stress and door binding in mobile builds. Set rough openings to manufacturer specs so each unit seats without forcing. Frame openings square and verify dimensions before installing sills, jambs, or thresholds.
Rough Openings, Shimming Strategy, And Water Management
Place shims primarily under the sill in mobile builds to limit side loads on glass and frames. Avoid heavy side shimming that introduces torsion when the structure moves.
Install a sill pan or water-resistant membrane first. Tape the sides and head, but leave the bottom open to allow any trapped water to drain outboard.
Sealing, Silicone, And Fastener Corrosion Resistance
Use high-quality silicone at exterior trims and where trim meets siding or wood panels. Select corrosion-resistant screws and fasteners for metal, plywood, and exterior panels to prevent staining and failure.
Confirm window operation, reveals, and compression seals before finishing interior trim. Coordinate flashing layers with siding and roof terminations for uninterrupted water control.
| Item | Best Practice | Benefit |
|---|---|---|
| Rough Opening | Per manufacturer spec + 1/8″ shim clearance | Easy seating and proper jamb alignment |
| Shimming | Bottom-focused shims; minimal side shims | Limits stress on glass during travel |
| Sill Pan / Membrane | Install first; tape sides/head only | Directs water out; prevents interior leaks |
| Fasteners | Stainless or coated screws | Resists corrosion at exterior assemblies |
Electrical And Power Planning
Good wiring starts with a mapped panel and proper wire sizes matched to expected loads. Plan circuits early so the electrical layout follows the build order and avoids rework. A labeled panel schedule saves time during inspections and future service.

Breaker Panels, Wire Gauges, And Circuit Mapping
Most builds use a 100-amp breaker panel with circuits separated by use: lighting, outlets, and fixed appliances. Use 14-gauge for 15A lighting circuits, 12-gauge for 20A receptacles, and 10/2 for heavier loads like a range or HVAC.
Map circuits clearly and attach a printed schedule inside the panel door. Include AFCI and GFCI protection where code requires it, especially near water and sleeping areas.
Load Calculations, Extension Limits, And Safe Power Use
Calculate total available wattage when using an extension supply. On a 15A/120V feed plan roughly 1,500W usable to avoid nuisance trips; devices like a Kill A Watt help track draw. Stage electrical rough-in before insulation and interior finishes.
- Route cables with neat drilling and guard plates at penetrations to prevent nail or screw damage.
- Choose conduit or raceways in areas planned for future upgrades to simplify changes.
- Group high-draw loads on separate breakers and label circuits for quick load management.
For detailed wiring tips and a practical panel checklist, see an electrician-focused guide — tiny house electrical.
Plumbing Systems, Water Heater, And Bathroom Fixtures
Efficient water runs reduce parts, save space, and lower leak risk over time. This section outlines practical routing, fixture choices, and test steps for a compact home.
PEX Routing, Protection Plates, And Pressure Testing
Use PEX for supply lines and secure with approved clamps and fittings. Plan routes with minimal bends and place manifolds where service access is easy.
Protect pipe penetrations with nail plates behind cabinets and at stud crossings. Insulate runs that face cold exposures to prevent freezing and heat loss.
Pressure test lines before closing walls to catch leaks early. A sustained test at recommended PSI avoids costly tear-outs after finishes go up.
Toilet Options, Shower Base, And Compact Sink Placement
Choose a toilet based on site hookups: standard flush for sewer, septic-ready for septic, or composting/cassette where hookups are limited. Pick models that fit the floor footprint and conserve water.
Place the shower base and drain to minimize trap runs and keep the required slope. Compact sinks and wall-mounted fixtures free floor space and simplify routing.
- Plan PEX runs with few fittings and protect penetrations with plates.
- Right-size a water heater to match daily water use and power limitations.
- Add shutoff valves at each fixture for fast maintenance in tight interiors.
- Coordinate electrical clearances around pumps or on-demand heaters for safe operation.
For layout ideas and efficient plumbing diagrams, see a practical plumbing layout guide at plumbing layout ideas.
Insulation, Air Sealing, And Climate Strategy
A smart approach to insulating a compact dwelling balances material R-values, moisture control, and ventilation.
Choose materials by cavity depth, local climate, and service access. Layered assemblies often combine mineral wool in studs with exterior rigid foam to reduce thermal bridging.
Fiberglass, Mineral Wool, Spray Foam, And Denim Pros/Cons
Compare options:
| Material | R‑Value/Inch | Moisture Performance | Ease Of Install | Best Use |
|---|---|---|---|---|
| Fiberglass Batts | ≈R‑3.7 | Moderate; performs poorly if wet | Easy; DIY friendly | Non‑moist walls, budget builds |
| Mineral Wool | ≈R‑3.8–4.0 | Excellent; resists water and mold | Moderate; cuts cleanly | Wall cavities and fire resistance |
| Closed‑Cell Spray Foam | ≈R‑6.0 | Vapor‑retarding; seals air leaks | Pro install recommended | Ceilings, tight cavities, rim areas |
| Recycled Denim | ≈R‑4.0 | Good if kept dry | Easy; non‑irritant | Eco‑friendly interior fill |
R-Values For Walls, Floors, And Ceilings By Climate Zone
Target R-values change by zone. As a rule, aim higher in ceilings and floors. Use layered EPS under floors for boosted R, and closed‑cell foam at roof cavities when space is tight.
Vapor Barriers, Ventilation, And Moisture Control
Balance vapor control with continuous ventilation. Use caulks, flashing tapes, and gasketing to stop convective air flow at joints and around windows and penetrations.
Tip: Inspect rim areas and plumbing penetrations carefully; small gaps add up in compact builds. For budget options and practical product choices, see budget insulation options.
Interior Finishes: Walls, Ceiling, Flooring, And Storage
Smart finish choices balance weight, resilience, and clean lines to maximize usable space. This helps the interior age well and reduces repair time after travel or heavy use.
Shiplap, Plywood, Drywall, And Tongue-And-Groove Choices
For walls, shiplap or plywood stands up to movement and holds fasteners for shelving. Drywall gives a seamless look but needs reinforced corners and extra fastening for a mobile-friendly home.
Tongue-and-groove boards work especially well on the ceiling. They add warmth and stay light, which helps center-of-gravity and weight goals.
LVP, Hardwood, And Tile For High-Moisture Areas
Choose LVP for most floors because it is durable and low-maintenance. Reserve tile for bathrooms and entries where water and mud are common.
- Match wall boards and floor choices to expected wear and ability to carry shelving loads.
- Integrate storage under stairs, benches, and toe kicks to unlock compact space.
- Balance wood tones with light paint to enhance perceived space and daylight.
- Stage finishing work so completed surfaces avoid dust and damage over time.
“Coordinate trim to hide movement gaps while keeping clean lines and long-term serviceability.”
Materials Sourcing, Budgeting, And Timeline
Sourcing the right parts early helps the schedule stay on track and reduces waste.
Start with a line-item budget tied to a clear procurement plan. DIY builds commonly land near $34,000–$35,000 when labor is self‑performed. Add a 10–15% contingency for overruns and change orders.

Where To Buy: Trusted Suppliers And Stock Items
Price-shop framing lumber, sheathing, and boards at 84 Lumber for reliable local stock and delivery options. Metal Roofing Source supplies metal panels, trims, and ridge caps ready for DIY installs.
L&W Supply is a strong source for insulation, drywall, and interior supplies. Owens Corning provides fiberglass and foam insulation to compare by R-value and cost.
Estimated Cost Ranges, Buffers, And Lead Times
Build a line-item budget that lists materials, freight, and allowances for specialty items. Sequence orders to match the plan so deliveries arrive just-in-time and avoid on-site damage.
- Track deposits and lead times for windows, doors, and roofing to keep the schedule moving.
- Balance bulk discounts against limited storage to prevent warped boards or weather damage.
- Tip: keep a 10–15% buffer and a simple calendar that flags long lead items early.
Legal, Zoning, DIY Vs Pro, And Common Mistakes
Before starting any building or construction work, confirm local rules and realistic expectations so the project stays legal and safe.
Zoning, Permits, And Certification Paths (NOAH, RVIA)
Check city and county planning sites to verify where the unit may be placed and lived in legally. Many jurisdictions treat small dwellings differently when classified as an RV, accessory dwelling, or permanent structure.
Obtain required permits for building, transport/parking, and utility hookups. When mobility or resale is planned, consider third-party certification like NOAH or RVIA to simplify acceptance by inspectors and campgrounds.
DIY, Subcontracting, And Quality/Safety Tradeoffs
Decide which scopes to self-perform and which to subcontract. Hiring licensed pros for electrical, plumbing, and roofing reduces risk and often shortens time to completion.
Tradeoffs: DIY saves money but can add time and liability. Subcontracting costs more but improves safety, inspection success, and long-term quality.
Frequent Pitfalls: Moisture, Overloading, And Rushed Finishes
Common mistakes include poor flashing that leads to leaks, insulation gaps that reduce comfort, and weak framing that undermines the structure. Overloading the trailer or ignoring axle limits creates a safety hazard.
At the end of the project, rushing finishes often causes callbacks and premature wear in the bathroom and other wet areas. Finish work methodically and follow a consistent water management plan.
| Issue | Cause | Prevention |
|---|---|---|
| Zoning Conflicts | Wrong classification or site choice | Verify local codes and get permits before building |
| Moisture Leaks | Poor flashing or improper sealing | Detail flashing, use tape, and maintain drainage paths |
| Structural Overload | Exceeding axle or framing limits | Respect axle ratings and balance loads during layout |
| Code Failures | Unpermitted electrical/plumbing work | Hire licensed trades for regulated scopes |
- Verify placement and legal occupancy with local planning offices.
- Obtain permits for foundation, utilities, and transport as required.
- Consider certification (NOAH/RVIA) if mobility or resale is likely.
- Subcontract critical systems to reduce time and improve inspection outcomes.
Conclusion
Build tiny house projects finish best when owners follow a clear sequence from foundation through finishes. A final pass on flashing, insulation, and load balance ensures the home performs long-term.
Each step connects to the next: framing sets openings, weatherproofing protects finishes, and systems install before trim. Measured planning and verified details reduce rework and costly surprises.
Hybrid approaches work well—DIY for visible work and licensed pros for high‑risk systems—so safety stays high while creativity remains. Finalize plans, source materials, and set a realistic schedule to begin the process with confidence.
For a practical checklist of tools and gear to support the build, see the essential tools and equipment guide at essential tools and equipment. In the end, small homes reward precision, patience, and consistent quality from start to end.
FAQ
What basic tools are essential for a DIY tiny house build?
For a successful DIY build, the crew needs a circular saw, miter saw, cordless drill/driver, framing nailer, level, tape measure, chalk line, and a jigsaw. Add a reciprocating saw and angle grinder for trailer and metal work. Safety gear like gloves, eye protection, ear protection, and a respirator are equally important.
How does one choose between a stationary foundation and a trailer?
The decision hinges on mobility, local codes, and budget. A trailer offers mobility and can bypass some zoning rules but demands strict weight management and axle ratings. A stationary foundation suits permanent placement, often allows larger builds, and may require standard building permits and inspections.
What trailer specs matter for weight and balance?
Select a trailer with axle ratings that exceed the projected gross vehicle weight. Check tongue weight limits, ensure frame squareness, and plan load distribution so about 10–15% of total weight rests on the tongue. Use crossmembers and reinforcement where heavy components concentrate.
Which subfloor materials and vapor barriers work best?
3/4″ exterior-grade plywood or 3/4″ OSB are common for subfloors when fastened with construction adhesive and screws. Use a continuous vapor barrier between the subfloor and trailer and consider closed-cell spray foam or rigid EPS panels under the floor for added insulation and moisture control.
What framing practices ensure structural integrity for walls and lofts?
Stick to consistent stud spacing (typically 16″ on center), use double top plates, and install king studs and proper headers around openings. Fasten with structural screws and nails, square frames before sheathing, and use metal hangers and blocking for loft joists to create sound structural connections.
How should the roof be designed for snow and wind loads?
Size rafters for calculated loads based on local codes and snow maps. Use a ridge beam where spans demand it, install sheathing with recommended fastener patterns, and add blocking and fascia to resist uplift. Metal roofing with proper fastening and ridge caps helps shed snow and improve durability.
What are the best exterior weatherproofing methods?
Start with a continuous house wrap, apply flashing tape at all seams and openings, and install drip edge at eaves and rakes. Use compatible flashing around windows and doors, then choose durable siding like engineered panels, cedar, or corrugated metal paired with a quality seal at fasteners.
How are windows and doors properly installed to prevent leaks?
Build accurate rough openings, use sill flashing and a bottom pan where appropriate, shim to plumb, and fasten per manufacturer specs. Seal with backer rod and silicone or compatible sealants, and cover nail fins with flashing tape to direct water away from the opening.
What electrical planning does a compact dwelling need?
Map loads and circuits early, choose the correct breaker panel size, and use appropriate wire gauges for each circuit. Plan dedicated circuits for high-draw appliances, locate outlets for future furniture placement, and follow NEC code or hire a licensed electrician for final connections and inspections.
Which plumbing systems work best in small builds?
PEX is ideal for tight routing and flexibility; protect it with plates where it passes through framing. For hot water, compact tankless heaters or small tank water heaters save space. Test with pressure checks, and choose fixture sizes—compact toilets and shower pans—designed for limited space.
How should insulation and air sealing be approached for different climates?
Match R-values to climate zone requirements: higher R in cold zones, moderate in mild zones. Closed-cell spray foam provides air sealing and high R per inch; fiberglass or mineral wool can work if combined with meticulous air barrier detailing. Include proper ventilation to control moisture.
What interior finishes perform well in small living spaces?
Lightweight plywood, shiplap, and tongue-and-groove boards save weight while giving a finished look. For floors, LVP or engineered hardwood resists moisture and keeps weight down; tile works in wet areas if the subfloor supports it. Prioritize multi-use built-in storage to maximize space.
Where can builders source materials affordably and reliably?
Major suppliers like 84 Lumber, L&W Supply, and Owens Corning offer framing lumber, insulation, and roofing materials. For metal roofing and specialty siding, order from reputable manufacturers or regional suppliers. Compare lead times and factor delivery costs into the budget.
What legal and permitting issues affect a DIY build on a trailer?
Regulations vary widely. Some jurisdictions treat trailer-based dwellings as RVs and have different rules than residential structures. Research local zoning, building permits, and certification paths such as RVIA or state-specific approvals. When in doubt, consult the local building department or a code consultant.
When should a DIYer call a professional?
Hire licensed pros for complex electrical service connections, plumbing tie-ins to municipal systems, structural engineering questions, and when local code requires permit-holder credentials. Professionals also help avoid costly mistakes in load calculations and waterproofing details.
What are common mistakes that extend timelines or increase costs?
Typical errors include underestimating weight, skipping air sealing, inadequate flashing at openings, and buying materials with long lead times. Rushed framing, poor load distribution, and inadequate waterproofing lead to rework. Build with buffers in the schedule and budget for contingencies.