A well planned tiny house plumbing layout can reduce water use dramatically — some compact systems cut consumption by nearly half while keeping full comfort.
This introduction shows how a compact plumbing system saves space and water in a small home. It explains how planning a clear house plumbing map minimizes lines and fittings and lowers leak risk and cost.

They learn why PEX and RV-grade parts speed installation and reduce joints. The text previews on-grid and off-grid water options: city hookups, tanks, pumps, and filters. It also outlines supply line routing, manifolds, and proper drain slope so each shower and sink clears cleanly.
Practical safety matters: venting, traps, and code awareness in the United States keep systems legal and odor-free. The intro sets expectations for smart conservation with low-flow fixtures and right‑sized hot water to cut waste and heat loss.
Key Takeaways
- Planning a compact system reduces material, labor, and leak points.
- PEX and RV-grade parts simplify installation in tight spaces.
- Choose on-grid or off-grid water sources for mobility and flexibility.
- Proper drain slope, vents, and traps prevent odors and backups.
- Insulation, heat tape, and short hot runs protect against climate issues.
- Learn practical steps and examples at tiny home plumbing resources.
Tiny House Plumbing Layout: What This How‑To Guide Will Cover
The guide follows a practical sequence from fundamentals to finished work. It walks the reader through planning, material choices, and on‑ and off‑grid water solutions.
Scope: This diy guide takes builders from concept to a completed house plumbing map with clear, testable steps. It spotlights how compact fixtures change water use and drain planning.
Readers learn to cluster fixtures to shorten lines and reduce fittings. The guide compares PEX, PVC/ABS, and copper so homeowners can pick parts that fit budget and skill. It notes U.S. code checkpoints early to avoid costly redesigns.
- Rough‑in supply with manifolds and PEX through studs.
- Drain runs, traps, and required slope to each drain.
- Shower steps: subfloor cut, pan/drain, waterproofing, venting, and leak testing.
| Topic | Focus | Outcome |
|---|---|---|
| Materials | PEX vs PVC/ABS vs Copper | Select cost & skill match |
| Water Source | On‑grid & Off‑grid | Flexible hookup options |
| Final Steps | Venting, insulation, costs | Reliable, code‑ready systems |
For real world cost ranges and a deeper technical reference, see a detailed resource on costs and systems at detailed costs and systems.
Understanding Tiny House Plumbing Fundamentals
Efficient water distribution in limited space relies on short runs and fewer fittings. This approach reduces heat loss and speeds hot water delivery while cutting leak points.
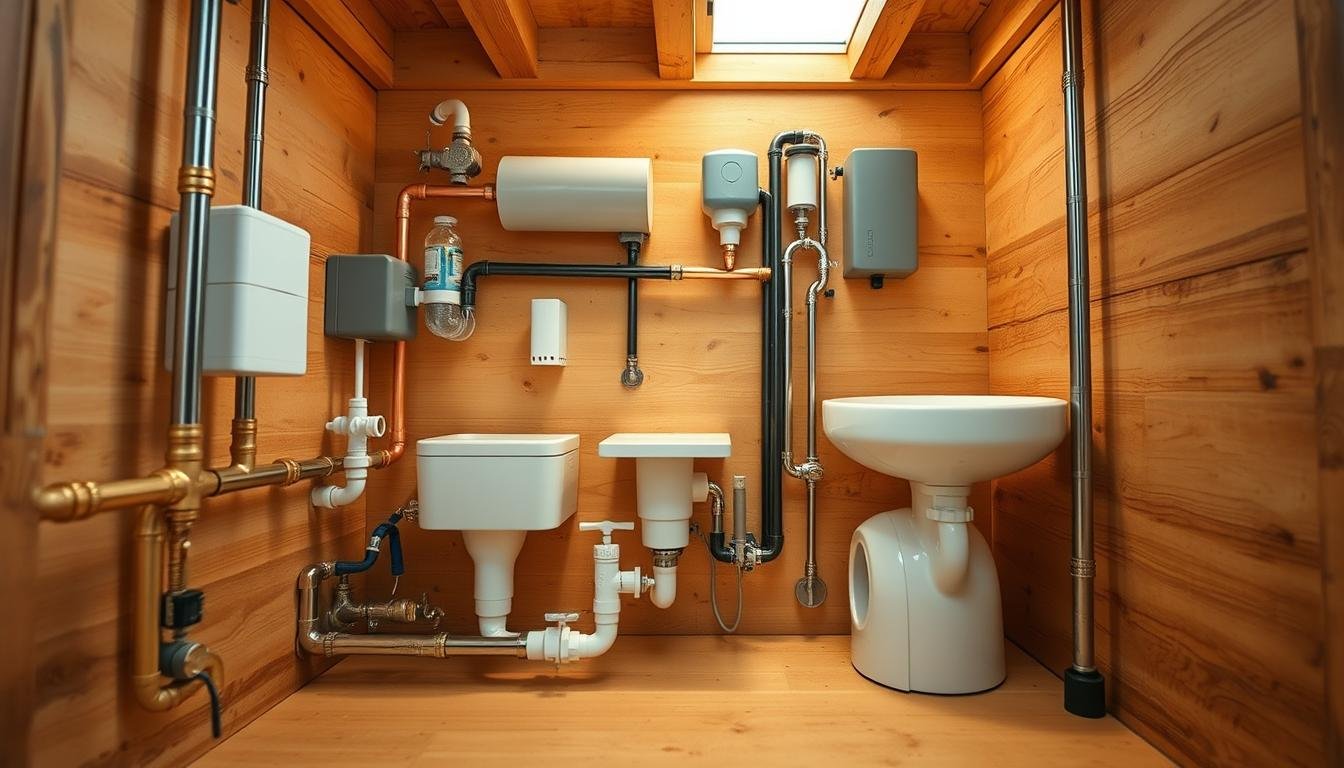
Basic Plumbing Components In Tiny Homes
The core components include a water source, cold and hot water lines, fixtures, drain lines, vents, and a compact water heater.
PEX often forms the supply network because it bends easily and needs fewer joints. Manifolds centralize control and make maintenance easier.
Key Differences From Traditional House Plumbing
Systems in small dwellings use shorter runs, smaller equipment, and mobile‑ready connections. That leads to faster water at taps and less wasted heat.
Vents and traps still preserve air seals and protect indoor air quality even with compact drains. Off‑grid setups add tanks, pumps, and filters to manage variable water quality.
- Color‑coded water lines speed troubleshooting.
- Low‑flow fixtures save water without losing comfort.
- Plan tank weight and access panels for safe moves and simple service.
| Feature | Compact System | Traditional System |
|---|---|---|
| Supply Material | PEX tubing, manifold | Copper or rigid piping |
| Run Length | Short, clustered | Longer, spread across rooms |
| Waste Handling | Holding tank or septic hookup | Sewer or septic connection |
Planning The Best Layout For A Tiny Home Plumbing System
Design begins by grouping wet areas to shorten runs and reduce parts. Clustering the kitchen, bathroom, and laundry against a shared wet wall lowers material and labor costs.
Clustering Fixtures To Shorten Water Lines And Drain Runs
Place sinks, shower, and toilet along the same wall so water lines and drain lines stay short. Wet wall stacks make venting simpler and reduce wall penetrations.
Back‑to‑back showers and vanities share drains and vents, cutting fittings and the chance of leaks. Group manifolds near the cluster to keep balanced pressure and short branch runs.
Optimizing Fixture Placement For Showers, Sinks, And Toilets
Use flexible pex to route supply through studs and around obstructions with fewer fittings. Align fixture heights and vents to streamline installation and service access.
Plan clearances for appliance doors and access panels for valves. Measure hot water travel to the shower to reduce wait time and water waste. Place the toilet where drain slope is easy and a vent connection is close.
“Short runs save money, reduce heat loss, and make the system more reliable over time.”
- Exterior access points for winterizing and shutoffs aid travel readiness.
- Thoughtful fixture placement improves weight balance and storage options.
Materials And Tools: PEX, PVC/ABS, Copper, And Essential Gear
The right combination of tubing, fittings, and quality tools defines a reliable, leak‑free water network. Choosing materials affects flexibility, cost, and how the system handles temperature changes.
When To Use PEX Tubing, PVC Pipes, And Copper
PEX tubing is flexible, freeze‑resistant, and fast to install, making it ideal for supply lines and compact manifolds. Use PEX for most cold and hot water branches where bending saves fittings.
PVC pipes or ABS remain the standard for gravity drain runs and vents because they are rigid and affordable. For transitions, use no‑hub couplings rated for waste systems.
Copper pvc (copper used instead of plastic) gives long life and heat resistance but adds cost and soldering skills. It suits owners who want durable hot‑water runs and higher temp tolerance.
Must‑Have Tools For Cutting, Crimping, And Sealing
- PEX cutter, crimp or expansion tool, and quality crimp rings for durable joints.
- Pipe wrenches, a deburring tool, hole saws sized per pipe, and an auger for clogs.
- Plumber’s tape, NSF‑rated sealants, and thread compounds for threaded connections.
- Manifolds to simplify branch control and clear labeling for fast winterizing.
- Stud safety plates to protect lines where they pass through framing.
| Material | Best Use | Pros | Cons |
|---|---|---|---|
| PEX Tubing | Supply lines, manifolds | Flexible, freeze‑resistant, fewer fittings | Requires crimp/expansion tools |
| PVC/ABS | Drain and vent lines | Cheap, rigid, easy solvent weld | Not for hot water runs |
| Copper | Hot water runs, durable segments | High heat tolerance, long life | Higher cost, needs soldering skill |
On‑Grid Vs Off‑Grid Water Source Options
Choosing between on‑grid hookups and onboard systems defines how a dwelling gets and keeps its water. This decision affects tanks, pumps, filtration, and freeze protection.
City Hookups, RV Water Inlets, And Direct Connections
On‑grid setups often use an RV water inlet and a potable hose for a fast connection at parks or driveways.
For stationary houses, direct buried insulated PEX tends to reduce freezing risk on the supply line. Backflow prevention and a pressure regulator protect fixtures and the municipal system.
Water Tanks, Pumps, And Storage For Living Tiny
Off‑grid systems rely on onboard water tanks, pumps, and filtration. Choose tank capacity by daily use and trip length to plan reliable water storage.
- Place water tanks over trailer axles to balance weight and improve towing stability.
- Compare 12‑volt diaphragm pumps for steady pressure with foot pumps for manual simplicity.
- Use heated hoses, pipe insulation, and heat tape where freezing is a risk.
- Add quick‑disconnects and shutoffs to switch easily between on‑grid and off‑grid modes.
| Option | Key Gear | Best For |
|---|---|---|
| On‑Grid | RV inlet, regulator, hose | Parks, long stays with hookups |
| Off‑Grid | Water tank, 12V pump, filter | Remote sites, living tiny |
| Hybrid | Quick‑disconnects, valve panel | Frequent moves and occasional hookups |
Practical tips: plan fill access and venting for tanks, and stage filtration for varying raw water quality. For drain or line routing, keep runs short and insulated. Conservative users often pick tanks in the 20–50 gallon range and refill based on usage patterns to avoid surprises.
Regulatory Compliance And Code Considerations In The United States
Meeting jurisdictional standards is the first step to avoid costly rework and to ensure safe water delivery and waste handling.
Local codes specify approved materials, required pipe sizes, and connection methods for a safe plumbing system. Inspectors check that fittings, vents, and transitions follow the adopted code.
Venting rules protect traps from siphoning and keep sewer line gases outside the home. Proper slope on each drain keeps flow self‑scouring and limits clogs.
Backflow prevention and vacuum breakers often appear at hose inlets and fixtures to protect potable water. Water heater installs must meet clearance, combustion air, and pressure relief discharge requirements.
- Confirm when RV‑style inlets or tanks are acceptable and when residential standards apply.
- Contact the authority having jurisdiction early to learn inspection steps and permits.
- Document pressure tests, leak checks, and label shutoffs and access panels for quick verification.
“Keep product manuals and certifications handy — inspectors and future buyers will thank you.”
For practical prep and mobile guidance, review mobile resources like mobile plumbing prep and design tips such as efficient layout ideas.
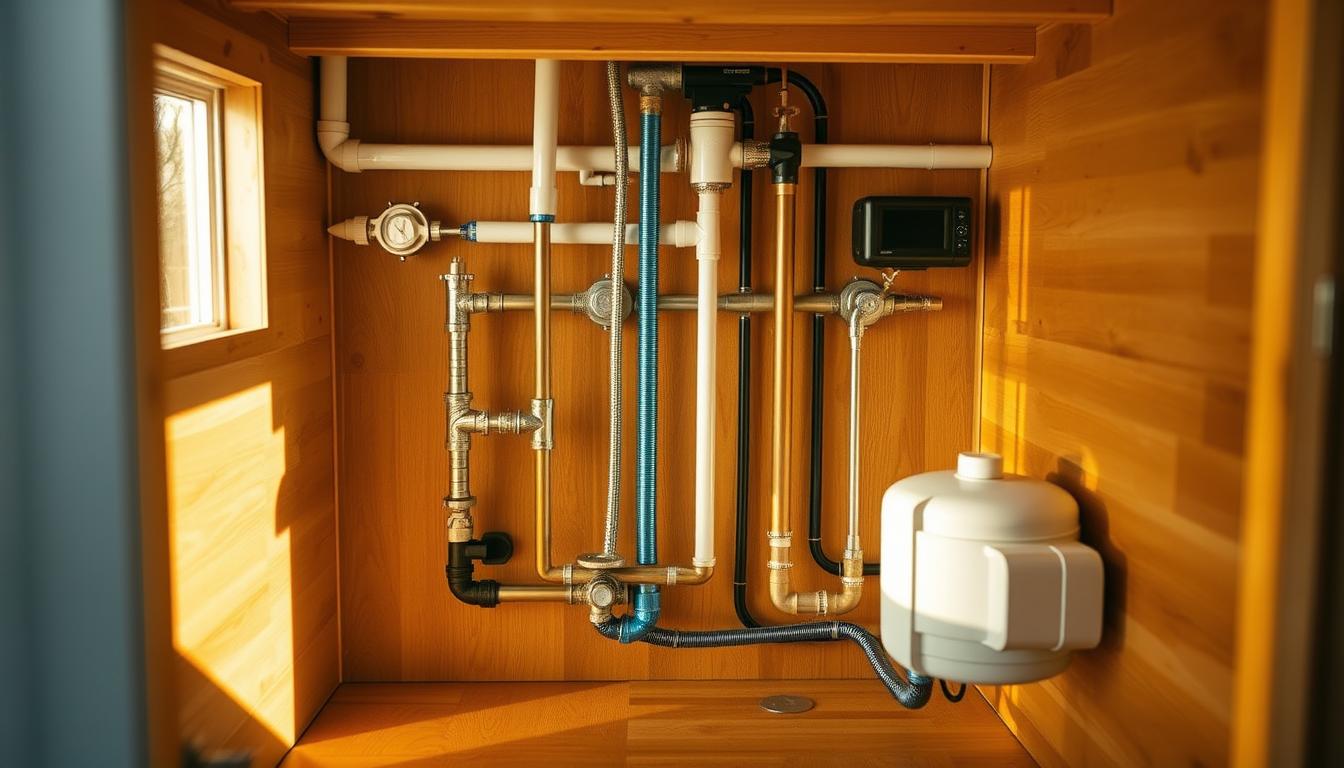
Step‑By‑Step DIY Rough‑In: Supply Lines, Manifolds, And PEX Runs
The rough‑in step turns schematic lines into physical runs, marrying the inlet to a labeled manifold and testable joints.
Installing The Water Inlet, Gauge, And Supply Manifold
Mount an RV city water flange near the kitchen or bath. Wrap the threads with plumber’s tape and attach a 1/2‑inch brass‑to‑PEX adapter to start the water supply.
Optionally add a pressure gauge with a PEX tee to monitor incoming PSI. Build a simple manifold on 1/2‑inch plywood and branch to the kitchen, outdoor faucet, shower, and water heater.
Routing And Insulating PEX Lines Through Studs
Drill centered stud bores with a 3/4‑inch auger and install safety plates to stop nail damage. Route each pex line without sharp bends; respect bend‑radius limits and use 90‑degree PEX fittings where needed.
Crimp ring or expansion fittings should be made per manufacturer steps, then pressure test the system before closing walls. Label each supply lines run at the manifold so service is quick.
- Seal RV inlet threads and adapt to PEX to begin the water supply.
- Tee in a pressure gauge to quickly diagnose PSI issues.
- Mount a plywood manifold so branches can be isolated for service.
- Center bores through studs, add plates, and avoid kinking the pex line.
- Insulate completed runs with foam sleeves to reduce heat loss and freeze risk.
Finally, make sure shutoff valves are accessible on each branch. Run a final pressure test at rough‑in to confirm leak‑free performance before insulation and finishes.
Step‑By‑Step DIY Drainage: Drain Lines, Traps, And Slope
A reliable drain system depends on correct trap assembly, venting, and a constant fall toward the outlet. This section walks through sink trap assembly, joining branch drains, and routing the outlet to a sewer or approved holding tank.

Kitchen And Bathroom Sink Drains With P‑Traps Or S‑Traps
Assemble sink traps using slip joints, washers, and nuts. Orient threaded portions upward so washers seat and the connection stays leak‑free.
P‑traps are preferred in most jurisdictions because they keep a fixed water seal. S‑traps may be allowed in certain small dwellings if local rules permit and a venting workaround exists.
“Seat gaskets squarely and hand‑tighten nuts before final snugging — this avoids cracks and leaks.”
Combining Drain Lines And Setting Proper Fall
Combine kitchen and bath branch drains into a single PVC drain line with a constant fall. Use 2‑inch PVC for main outlet runs and extend to the sewer line, septic, or holding tank as required.
- Solvent‑weld PVC pipe and fittings with primer first, then cement for strong, permanent joints.
- Install vents to admit air and protect trap seals so water flows freely and odors stay out.
- Add cleanouts at accessible spots to clear clogs without demolition.
- Size transitions so the shower drain and sink flows do not exceed pipe capacity.
- Fit strainer baskets and hair catchers at sinks and shower drains to protect the pipe from debris.
| Task | Recommended Component | Why It Matters |
|---|---|---|
| Sink Trap Assembly | P‑trap, slip nuts, washers | Creates seal, easy service access |
| Main Drain Run | 2‑inch PVC, primer & cement | Handles combined flow to sewer or tank |
| Venting & Cleanouts | Vent stack, threaded cleanout | Protects traps, allows maintenance |
Before closing cabinets or walls, fill fixtures and run test water to check for leaks. Pressure‑test sections and visually inspect joints. Correct any seepage, then finish the assembly for long service life.
Shower Installation Details: Pan, Shower Drain, And Subfloor Prep
Proper shower prep starts with precise cutting and a matched drain so the pan sits true and seals reliably. The work focuses on the subfloor opening, a compatible drain assembly, and careful waterproofing to protect the home from leaks.
Cutting The Subfloor And Fitting The Drain Assembly
Locate joists and electrical runs before cutting. Mark the center and cut a 2‑inch hole using a hole saw or jigsaw. Avoid compromising framing or services.
Select a no‑caulk shower drain that matches the pan. Assemble washers and rubber seals per manufacturer directions. Tighten fasteners enough to compress seals without deforming them.
Below the pan, primer and cement the PVC pipe connection. Align the pipe run to maintain slope and clearance to the outlet.
Waterproofing, Venting, And Final Leak Checks
Waterproof walls and the pan area with a membrane or liquid product such as RedGard. Pay attention to seams, corners, and any penetrations.
Ensure a vent is available near the trap so the drain stays stable and free of gurgling. Set the pan level, shim if needed, and confirm waste alignment before finishing walls or tile.
- Flood‑test the pan by plugging the drain for 24 hours and inspect below for leaks.
- Seal wall panels or tile with flexible grout or sealant to allow movement in the home.
- Final checks: turn water on/off, visually inspect joints, and document for future maintenance.
Water Heating In Tiny Houses: Tankless, Tank, And Solar Options
Deciding on a water heater affects comfort, energy, and installation complexity. Choices include compact tankless units, small electric tanks, and solar preheat or hybrid systems. Each option trades space and recovery time against cost and service needs.

Choosing The Right Water Heater For Space And Demand
Tankless units save room and deliver on‑demand hot water, but they need adequate electrical or gas capacity for peak flows. Small electric tank water heaters are simpler to install and require less venting.
Size by simultaneous fixture flow and required temperature rise. A quick method is to add fixture flow rates, then match that to a unit’s GPM rating to avoid shortfalls.
Hot Water Supply Lines, Safety, And Efficiency Tips
Keep hot runs short and insulate supply lines to reduce wait time and heat loss. Install T&P relief valves with proper discharge routing and place drip pans under tanks.
- Provide combustion air and venting for gas models; maintain service clearances.
- Consider electric models for simple installs; choose gas where high flow in cold climates is needed.
- Use mixing valves to prevent scalding and stabilize temperature swings.
- Combine solar preheat or heat‑pump hybrids to lower energy use when space allows.
- Flush tanks periodically to remove mineral buildup and extend life.
For detailed guidance on sizing and model choices, review a focused guide on choosing a tiny water heater at how to choose a tiny house hot water. Make sure service access and clearance remain unobstructed for safe maintenance.
Leveraging PEX Plumbing And RV‑Grade Components
PEX systems make routing supply easier in tight framing and cold regions. They reduce fittings, speed installation, and simplify future service.
Why PEX Lines Shine In Tight Spaces And Cold Climates
PEX tubing weaves through studs and cavities, cutting the number of joints. Fewer joints mean fewer leak points and faster rough‑in work.
RV‑grade fixtures and compact sinks fit well in small rooms. These parts tolerate vibration and frequent moves, and many use less water without losing function.
- Speed: pex plumbing reduces fittings and accelerates installation in tight bays.
- Freeze resistance: A pex line resists burst risk better than rigid pipe when slightly frozen.
- Serviceability: Quick‑connects and modular branches let owners swap fixtures with minimal work.
- Respect bend radius; use elbows rather than kinked lines to keep full flow to each drain.
- Insulate exposed runs and apply heat tape in severe winters; carry a small repair kit on the road.
- Verify potable ratings and temperature limits for all PEX components before install.
“Use PEX where flexibility and durability matter most; pair it with RV parts for compact, reliable systems.”
Water Supply And Management: Filtration, Pressure, And Conservation
Good water management starts with simple filtration, steady pressure, and habits that stretch every gallon.

Inline Filters, Pressure Regulation, And Flow Rates
Filter options range from single carbon cartridges for taste to multi‑stage units that remove sediment and chemicals. Place a sediment prefilter at the inlet and a carbon or carbon‑block unit after the tank to protect fixtures and the heater.
Set a pressure regulator at the water line when using a city hookup. A 50–60 PSI target prevents leaks and extends fixture life. Match faucet and shower flow rates to the hot water output so the heater keeps up without waste.
Low‑Flow Fixtures And Smart Habits To Save Water
Install low‑flow aerators and 1.5–2.0 GPM showerheads to keep comfort while cutting demand. Tankless units reduce standby losses and pair well with short pex runs.
- Monitor pressure with a gauge and swap cartridges on schedule.
- Label shutoffs under sinks and near the heater for fast isolation.
- Stagger appliance use and fix leaks promptly to protect limited onboard stores.
| Issue | Recommended Action | Why It Matters |
|---|---|---|
| Sediment | Sediment prefilter at inlet | Protects valves and cartridges |
| High PSI | Install pressure regulator (50–60 PSI) | Prevents leaks and fixture damage |
| Excess Demand | Use low‑flow fixtures, stagger use | Matches flow to heater capacity |
For a practical kit and routine, see the DIY water system checklist. Make sure filter changes and winterizing steps are logged to keep the home’s water supply reliable.
Drainage, Venting, And Waste Disposal Essentials
A reliable waste system balances odor control, venting, and safe reuse opportunities for nonpotable water.
Greywater Reuse And Blackwater Handling
Greywater from sinks and showers can be filtered and reused for irrigation where local rules permit. Filtering, simple disinfection, and soil absorption protect plants and reduce water demand.
Blackwater—toilet waste—must go to a septic, approved dump station, or municipal sewer line. Treat it as a regulated stream and plan access for safe emptying and inspection.
Atmospheric Vents, Airflow, And Odor Control
Proper vent sizing and routing keep air moving and protect trap seals. Vent stacks and correctly placed atmospheric vents prevent trap siphonage and unpleasant odors.
Where codes allow, use air admittance valves to shorten vertical runs. Label vents and cleanouts and route them above the roof line or to approved locations to preserve airflow.
Composting Vs Traditional And Incinerating Toilets
Composting toilets cut water use and work well off‑grid, but they demand regular maintenance and correct compost handling.
Incinerating models reduce waste to ash and suit sites without a sewer line, though they need reliable power and proper venting. Traditional flush toilets remain familiar but require septic or municipal connections.
- Distinguish greywater and blackwater streams and follow local disposal rules.
- Use filters and soil absorption for safe greywater irrigation where legal.
- Size vents to protect trap seals; consider AAVs for compact installs.
- Compare composting, incinerating, and flush toilets for water use, power needs, and maintenance.
- Label waste lines, access cleanouts, and confirm regulations before choosing a system.
“Good venting and clear separation of waste streams reduce odors and simplify service.”
Tiny House Bathroom Layouts That Work
A well-designed compact bathroom treats fixtures, drains, and ventilation as one efficient system. This approach saves space and keeps water controlled so finishes last.

Wet Bath Designs, Central Drains, And Space‑Saving Fixtures
Wet bath designs waterproof the entire room and use a central drain to free floor area. This lets a single floor plane serve the shower and the rest of the space.
Typical tiny house bathrooms range from about 4×3 feet to 5×8 feet and often use less than a quarter of total living area.
- Space savers: corner sinks, wall‑mounted vanities, and narrow toilets open circulation without losing function.
- Integrate storage with floating shelves and recessed niches placed out of the shower spray path.
- Slope the floor subtly toward the central drain so water does not pond and finishes stay dry.
- Choose slip‑resistant flooring and waterproof wall panels or tile for long life.
Ventilation Strategies To Prevent Moisture And Mold
Strong ventilation is critical in sealed small homes. Compact exhaust fans sized for the room must run long enough after a shower to clear humidity.
Use a timer or humidity sensor to ensure the fan purges moist air. Add a small window or skylight for daylight and cross‑ventilation while maintaining privacy.
- Provide access hatches to valves and manifolds behind panels for service without reconfiguring the plan.
- Place fixtures to keep hot and cold lines short; this reduces wait time and conserves water.
Note: Thoughtful fixture placement that clusters services keeps the line runs short and simplifies the overall system for the home.
Protecting Plumbing From Climate Challenges
Seasonal extremes expose weak spots in supply lines and tanks, so proactive protection pays off. Owners should plan measures for freeze and heat to keep water flowing and avoid damage.
Insulating Against Freezing And Using Heat Tape
Wrap cold runs with foam insulation and add thermostat‑controlled heat tape in areas prone to deep freezes. This prevents burst pipes and preserves the cold water supply.
Seal air leaks around penetrations to keep icy air out of cavities. Use insulated boxes for exposed valves and bury exterior lines below local frost depth when possible.
Hot-Weather Considerations For Water Lines And Tanks
In hot climates, shade the water tank and insulate heater enclosures to limit temperature swings. Reflective barriers on roofs and around tanks tame attic heat and prolong component life.
PEX tolerates expansion better than rigid piping, but fittings and seals still need UV and heat protection. Drain hoses, use heated hoses for stationary hookups, and check for UV damage regularly.
- Make sure exterior penetrations are sealed to block cold air.
- Schedule seasonal inspections and flush heaters to remove sediment.
- Winterize for long absences: drain lines, protect traps, and isolate tanks.
- Monitor water temperature swings and adjust insulation strategies accordingly.
“A short maintenance routine before season changes saves repair costs and keeps systems reliable.”
Costs, Budgeting, And Resource Efficiency For Plumbing Systems
A clear budget helps owners balance upfront expense with future savings on repairs and energy. This section outlines typical ranges, DIY savings, and choices that reduce long‑term operating costs.
DIY Savings, Typical Price Ranges, And Labor Factors
Material costs for a compact system often fall between $1,500 and $4,000. Bathroom installs can range $1,000–$7,300, with whole‑house work adding $500–$3,000.
Labor runs about $100–$200/hour and may require 5–10 hours or more. A solid diy guide using PEX and RV‑grade parts can cut costs by reducing paid hours.
Example part prices show how small choices add up: right‑angle push fittings ~$50.50 (5 pcs), 25‑ft PEX roll ~$14.76, tee push fitting ~$13.44, shower P‑trap ~$4.35, deburring tool ~$10.96, removal tool ~$2.00.
Selecting Durable Materials To Reduce Long‑Term Costs
Choose NSF‑certified valves, quality manifolds, and corrosion‑resistant fittings to avoid premature failures. Durable parts cost more up front but lower service calls.
Account for operating costs: efficient water heaters, low‑flow fixtures, and a properly sized water tank cut utility spend. Keep a 10–15% contingency for code changes or reroutes.
“Spending on quality parts and a clear budget saves time and money over the life of the system.”
| Item | Typical Cost | Why It Matters |
|---|---|---|
| Materials (total) | $1,500–$4,000 | Range reflects fixtures, PEX, and fittings |
| Bathroom | $1,000–$7,300 | Fixture quality and finish affect cost |
| Labor | $100–$200/hr (5–10+ hrs) | Skilled time for rough‑in, venting, tests |
| Key Parts (examples) | Push fittings, PEX roll, P‑trap | Small parts add up; buying quality helps |
Conclusion
A clear, stepwise plan helps owners turn sketches into a durable water system that works year‑round. Following the guide ties fundamentals to materials, rough‑in, drain runs, shower prep, and the right hot water heater for demand.
Compact designs with manifolds and short lines deliver fast hot water and lower waste. Use PEX for flexible routing, keep vents correct, and preserve a steady drain slope for trouble‑free service. Insulate and pick a heater that suits four‑season use.
Document tests and codes, inspect fittings periodically, and adapt between on‑grid and off‑grid modes. With careful steps and code checks, readers can confidently build an efficient plumbing tiny house system or call pros for complex connections.
FAQ
What are the essential components of a compact plumbing system for a small home?
A compact system typically includes a water source (city hookup, RV inlet, or storage tanks), a supply manifold, PEX or copper supply lines, shutoff valves, a hot water heater (tank or tankless), drain lines with P‑traps, vents, and a holding or sewer connection. It also needs basic accessories like pressure regulators, inline filters, and a waste pump if using blackwater tanks.
Why is PEX tubing often recommended for tight living spaces?
PEX tubing is flexible, resists freezing better than rigid pipe, and reduces the number of fittings needed, which shortens installation time and leak risk. It is easier to route through studs and curves, making it ideal for compact builds and DIY installs when paired with a proper manifold and crimping tools.
How should fixtures be arranged to minimize pipe runs and save water?
Cluster wet fixtures—shower, sink, and toilet—near a single manifold or service chase. That shortens both hot and cold supply runs and drain lengths, reduces heat loss in hot water lines, and simplifies venting. Centralized placement lowers material costs and improves efficiency.
What hot water heater options work best in limited space?
Tankless on‑demand units save space and reduce standby heat loss; small point‑of‑use tanks are compact and affordable; propane or electric combination units fit tight installs where fuel type dictates choice. Evaluate peak flow needs and fuel availability before selecting a model from reputable brands like Rinnai or Bosch.
How does one decide between on‑grid hookups and off‑grid water systems?
Choose city hookups when steady pressurized supply and sewer connections exist. Off‑grid systems use storage tanks, pumps, and filtration—best for remote sites. Consider daily water demand, refill logistics, and waste handling. Off‑grid setups require larger storage, reliable pumps, and conservation measures.
What materials should be used for drains and vents in a compact build?
Use PVC or ABS for drain, waste, and vent piping due to durability and code acceptance. Ensure proper slope (typically 1/4″ per foot for horizontal drains), correct trap installation, and properly sized vents to prevent siphoning and odors. Local codes determine exact pipe sizes and materials.
How can freezing be prevented in water lines during cold weather?
Insulate supply and tank lines with foam or fiberglass, use heat tape on exposed runs, route lines through conditioned spaces where possible, and locate tanks inside insulated compartments. Drain and winterize systems when vacant. For extreme cold, consider recirculation or trace heating systems.
What are the key code and permitting concerns in the United States?
Compliance includes approved materials, proper venting and trap placement, fixture clearances, backflow prevention, and approved water heater installations. Codes vary by state and county; always consult local building departments and follow the International Residential Code (IRC) or local equivalents. Permits often cover water, gas, and waste connections.
How should greywater and blackwater be managed for mobile or off‑grid setups?
Greywater can be routed to a separate tank for reuse in irrigation where allowed, using filters and gentle discharge methods. Blackwater requires a sealed tank and legal disposal at dump stations or an approved septic system. Composting or incinerating toilets offer alternatives that reduce holding tank volume and disposal needs.
What basic tools and fittings are necessary for a do‑it‑yourself supply-line rough‑in?
Essential tools include a PEX crimper or cinch tool, tube cutter, deburrer, tape measure, level, and adjustable wrenches. Stock fittings like PEX elbows, tees, manifolds, shutoff valves, and hose bibs. For PVC drain work, use primer, solvent cement, a saw, and fittings sized to code.
How can water conservation be maximized without sacrificing comfort?
Install low‑flow showerheads and faucet aerators, choose efficient fixtures, fix leaks promptly, and adopt water‑saving habits. Use a small circulation loop or insulation to reduce wait time for hot water. Combine efficient appliances and monitoring to keep daily use low while maintaining comfort.
Are tankless water heaters suitable for multi‑fixture use in compact dwellings?
Tankless units can serve multiple fixtures if sized correctly for peak flow and temperature rise. Electric models need significant power; propane or natural gas units often handle higher combined demand. Verify manufacturer flow ratings and consider a small buffer tank for simultaneous use.
What inspections or tests should be performed before finishing walls and floors?
Pressure‑test supply lines (usually 100 psi for PEX) and conduct a water supply leak test. Test drain systems with a water fill or air test per code, check venting for airflow, and perform a water heater pressure relief and combustion check if gas powered. Address leaks and clearances before closing finishes.
How should a builder handle water filtration and pressure regulation?
Install a sediment and carbon filter upstream of fixtures if using well or tank water, and include a pressure regulator if sources exceed the acceptable pressure for fixtures (commonly 50–60 psi). Add a pressure gauge and a shutoff valve for maintenance. Use NSF‑rated components for potable systems.