One surprising fact: a well‑run composting system can cut household water use by thousands of gallons per year compared with traditional flush toilets.
This introduction explains why a composting approach is often the most practical way to manage human waste in a tiny living space or off‑grid site. It outlines key options, from manufactured units like Separett Villa and Nature’s Head to a DIY bucket method based on the Humanure approach.
The guide previews how separation, aeration, and evaporation work together to keep odors down and reduce sewage. It also notes the role of negative‑pressure fans, urine diversion, and bulking materials in modern systems.
Readers will learn what to expect for installation, vent routing, fan wiring, and routine maintenance so they can pick the right system, save water, and avoid common mistakes.

Key Takeaways
- Composting toilets save large amounts of water compared to flush toilets.
- Popular manufactured systems include Separett Villa and Nature’s Head; DIY bucket systems offer a low‑cost option.
- Separation, aeration, evaporation, and bulking materials control odor and speed composting.
- Fans and urine diversion are core technologies that improve performance.
- The guide covers planning, installation, venting, and safe handling to reduce mistakes.
Tiny House Composting Toilet Guide Overview
Many RV, off-grid, and ADU owners now choose a self-contained unit that treats human waste without sewer hookups. This section frames what buyers should compare and what to expect during installation and regular use.
Who This Buyer’s Guide Is For
This overview is tailored to people evaluating a composting toilet solution for a tiny home, ADU, cabin, or mobile setup where traditional plumbing is impractical. It helps readers weigh options from manufactured units to simple DIY systems.
- Scope: foundational concepts, system comparisons, pre‑install design, installation steps, odor control, maintenance, climate and mobility, costs, and compliance.
- User profiles: new builds, renovations, or those switching from flush toilets to cut water use and infrastructure expense.
- Expectations: routine emptying, mixing bulking material, and keeping vents and fans maintained for reliable performance.
Design matters: space allowance, vent routing, and basic electrical planning make the chosen system fit cleanly into the house layout. The right pick balances odor‑free operation, easy cleaning, predictable emptying intervals, and durable parts that are simple to replace.
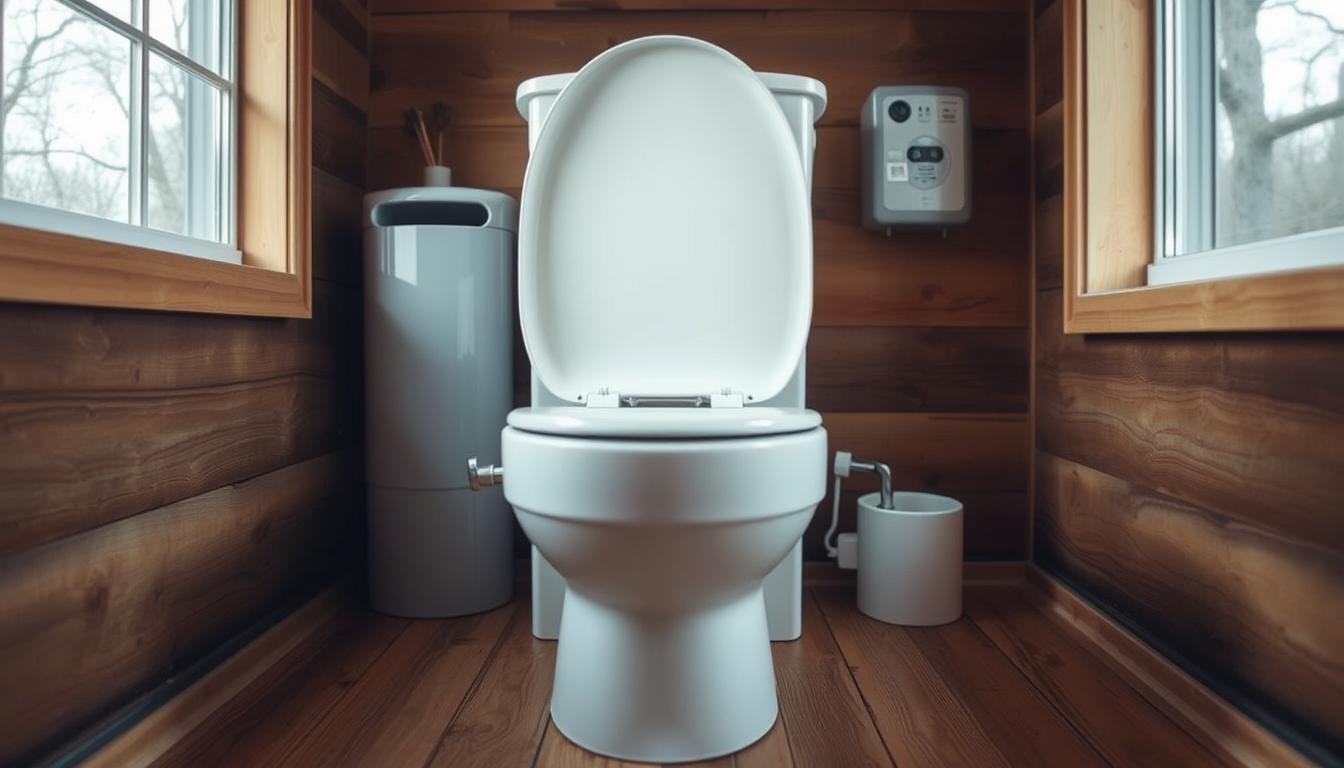
What Is A Composting Toilet?
A composting toilet is a waterless waste management system that turns human waste into stabilized organic material over time. It uses controlled aeration, moisture balance, and carbon-rich cover to speed decomposition while keeping odors low.
Human waste is mostly water, so many designs separate liquids from solids to reduce volume. Evaporation and urine diversion make the core process cleaner and extend the interval between emptying.
Modern models use a small vent fan to create negative pressure. Air draws inward through the bowl and exits outside, which keeps the living space odor-free during use.
- Bulking materials like peat moss, sawdust, or coir add carbon and improve aeration.
- Some units are self-contained; others route solids to an external compost area to finish before use as soil amendment.
- Finished compost may be handled as disposable material or matured off-site into a safe fertilizer for non-edible landscaping, following local rules.
Models range from premium manufactured units to simple bucket systems, each with different setup and maintenance needs. Choosing the right one depends on space, use patterns, and local regulations.
Why Composting Beats Traditional Flush Toilets For Tiny Homes
When space and hookups are limited, waterless sanitation becomes the easiest path to reliable waste management.
Flush toilets depend on large volumes of water to move waste into sewers or a septic system. That mixing creates sewage that is costly to treat and often smells stronger than dry systems.
Composting systems cut water use dramatically. They keep solids separate or aerated so waste stabilizes faster. That reduces clogs, cuts splashing, and simplifies cleaning.
The lack of a municipal connection often forces owners of small dwellings to choose an independent solution. A composting toilet avoids the expense and site work of sewer taps and septic installation.
Mechanical features like negative‑pressure fans and urine separation stop odors from entering living areas. Proper venting and bulking materials make the experience quiet, hygienic, and comparable to standard toilets.
“Adopting on‑site treatment reduces water bills, lowers sewage output, and supports sustainable living without sacrificing comfort.”
| Feature | Traditional Flush | Composting System |
|---|---|---|
| Water Use | High per flush | Minimal to none |
| Sewage Creation | Generates sewage for treatment | Stabilizes waste for safe handling |
| Infrastructure Need | Municipal sewer or septic system | No sewer hookup required |
| Maintenance | Plumbing repairs, unclogging | Emptying, bulking material, fan check |
- Environmental gain: less water and fewer chemicals.
- Practical benefit: lower upfront connection costs and smaller ongoing bills.
- User experience: fewer clogs, less noise, and controlled odors.
Composting Toilet Systems And How They Work
Well‑designed systems balance airflow, moisture, and carbon to turn human waste into a stable, low‑odor material.
Evaporation, Separation, And Aeration Basics
Evaporation reduces liquid in the chamber so microbes can do their job. Small fans create negative pressure that pulls air from the room, past the waste, and out an exterior vent. This steady airflow controls odors and keeps the composting process active.
Separation is key: some bowls separate liquids at the front, while other units channel urine inside the chamber to evaporate later. Keeping urine apart from solids prevents excess moisture and smell.
Bulking Materials Like Peat Moss, Sawdust, And Coconut Coir
Carbon‑rich materials such as peat moss, sawdust, and coconut coir open air channels and hold odor in check. Users add a scoop after each use to maintain balance.
- Moisture control: too wet slows decomposition; too dry stalls it.
- Fans and vents: often self‑regulate humidity; some models add gentle heat to aid evaporation.
- Mixing: cranks or agitators keep solid waste aerated and speed composting.
Practical tips: add bulking materials regularly, inspect vent seals, and test the fan periodically. These habits keep the system working and extend the time between full emptying.

Best Composting Toilets For Tiny Houses
Different designs suit different lifestyles. This short guide compares four leading options so readers can match cost, maintenance, and mobility needs to the right solution.
Separett Villa: Urine Separation, 12‑Volt Fan, And Low‑Odor Design
Separett Villa separates urine for near odor‑free operation. It uses a continuously running fan (roughly 12–17W on some models) and needs exterior venting. Solids can be bagged in compostable liners. Typical price: $989–$1,400.
Nature’s Head: Agitator Mixing, Venting Hose, And Bulking Agents
Nature’s Head includes an agitator to mix solids and air. Users add peat moss or coconut coir as bulking material. It vents with a small fan and has a front urine tank to empty regularly. Price: about $995.
Bucket System: Ultra‑Low Cost DIY With Proper Cover Material
A bucket setup follows Humanure practices: a lined or bare bucket, cover material after each use, and transfers to an outdoor compost pile. It is the lowest cost option but needs disciplined handling for safe compost.
Biogas Option: Turning Waste Into Cooking Fuel
Biogas kits convert waste into methane in roughly 20 days with added bulking. They cost more up front (kits around $1,455) and work best for stationary homes. The system produces fertilizer as a byproduct.
| Option | Key Feature | Maintenance | Approx. Cost |
|---|---|---|---|
| Separett Villa | Urine separation, low odor, fan vent | Empty solids, check fan | $989–$1,400 |
| Nature’s Head | Agitator mixing, internal fan, urine tank | Add bulking, crank agitator, empty urine | ≈$995 |
| Bucket System | Simple, low cost, needs cover material | Move to outdoor compost pile | Nearly free–low cost |
| Biogas System | Waste-to-fuel, methane for cooking | Feed, monitor digester, manage output | ≈$1,455 |
For a quick comparison of models and buying tips, see the best composting toilets resource linked here. This helps match experience and maintenance rhythms to the chosen option.
Sizing And Capacity For Tiny Homes
A well-sized unit balances solids storage, urine capacity, and venting to fit how occupants actually use the bathroom.
Match Capacity To Occupancy. Solo dwellers can pick compact models with small solids chambers. Couples living full time usually need a system that lets solids be emptied about once per month and urine tanks emptied every other day.
Weekend or “weekender” models have smaller bins and suit intermittent use, but they need more frequent service. Larger solids chambers and effective liquid separation reduce emptying time and lower maintenance frequency.

| Household | Solids Emptying | Urine Emptying | Recommended Feature |
|---|---|---|---|
| Solo (full time) | Every 6–8 weeks | Every 2–4 days | Compact solids bin, good separation |
| Couple (full time) | About monthly | Every other day | Larger solids chamber, larger urine tank |
| Weekend Use | Every 2–4 weeks | Weekly | Small model, easy access for emptying |
Choose a model whose dimensions and accessories (liners where allowed) suit the tiny house layout. Proper vent fan sizing and runtime control help manage moisture and extend the time between handling solid waste.
Design And Pre‑Install Planning For Tiny Homes
Planning the sanitation layout early saves retrofit headaches and keeps living areas functional.
Space, Electrical, And Vent Routing Considerations
Choose a unit during the design phase so floor space, clearances, and service access are reserved. This makes emptying bins, reaching agitators, and swapping urine tanks simple and safe.
Electrical: plan a dedicated circuit for low‑draw fans. Many fans run on 12V DC or low‑watt AC and may need continuous power for proper operation. Locate an inverter or a switched outlet near the unit if the manufacturer requires constant runtime.
Vent routing should favor straight runs and short lengths. Use weatherproof terminations, insect screens, and sealed penetrations to hold negative pressure and prevent backdrafts. Separett models use a continuously running fan; Nature’s Head commonly connects with a flexible vent hose.
- Reserve wall or ceiling chases for vents and keep bends to a minimum.
- Consider noise and airflow paths so fans and vents do not interrupt quiet living spaces.
- For bucket or DIY systems, a bathroom exhaust fan can supplement ventilation if routed to the exterior.
- In cold climates, insulate vent runs and plan for condensation control to avoid ice or water buildup.
For step‑by‑step installation and manufacturer details, see the installing a composting toilet resource.
Step‑By‑Step Installation Checklist
A stepwise approach to mounting and venting saves time and avoids costly retrofits.
Site Prep, Mounting, And Securement
Inspect floor structure and blocking before placing the unit. Verify fastener locations and reinforce the subfloor where wheels or movement could loosen mounts.
Secure the base with manufacturer-recommended hardware. Check seat height and access panels for regular service.
Venting And Fan Wiring
Cut and seal a wall or roof penetration sized for the vent. Install the fan per specs and confirm airflow direction to maintain negative pressure away from living spaces.
Wire the fan to a dedicated 12V or AC circuit. Add correct fusing, strain relief at pass-throughs, and weatherproofing at exterior terminations.
Urine Diversion And Liquid Handling
Set up the diverter so urine routes cleanly to a front container or approved drain. Nature’s Head models collect urine in a removable tank; Separett needs continuous fan and exterior venting to stay odor-free.
Startup With Bulking Material And Testing
Add initial bulking material to the solids chamber, verify the agitator or mixing function, and perform a dry run. Confirm vent suction, mixing action, and any drain fittings before first use.

| Step | Action | Checklist Items |
|---|---|---|
| Site Prep | Mounting & blocking | Floor reinforcement, fasteners, seat height |
| Venting | Penetration & fan | Seal penetrations, fan orientation, exterior termination |
| Wiring | Power for fan | Dedicated circuit, fuse, strain relief |
| Liquid Handling | Urine diversion | Front tank or drain, splash-free outlet |
| Startup | Bulking & testing | Initial cover material, agitator test, dry run |
Final Checks: lid seal, bagging options where allowed, spare bulking materials, and clear guest instructions. For detailed manufacturer steps and full installation photos see the installation guide.
Odor Control, Ventilation, And Fan Setup
Effective odor control hinges on steady airflow, correct moisture, and regular mixing to keep compost stable and smell-free.
Negative Pressure And External Vents
Maintain negative pressure so air is drawn through the bowl and out the vent. A simple test is to hold a tissue at the rim; it should pull inward. If flow reverses, inspect for obstructions, reversed fan wiring, or collapsed ducts.
- Route vents with as few bends as possible and use smooth interior walls to reduce resistance.
- Fit weather caps and insect screens at the termination to keep drafts and pests out.
Moisture Balance And Mixing Techniques
Too-wet chambers smell and form sludge; too dry stalls breakdown. Signs of excess moisture include strong odors and soggy material.
Correct wet bins by adding dry bulking material and running the fan continuously until humidity drops. Manual mixing—regular crank rotations on models like Nature’s Head—keeps solids aerated and speeds compost action.
“Separate liquids where possible; urine mixed with solids often increases odor and shortens service time.”
| Issue | Action | Check |
|---|---|---|
| Reversed airflow | Check fan wiring and seals | Tissue test, fan direction |
| High moisture | Add bulking, extend fan runtime | Odor, sludge, dampness |
| Poor mixing | Increase crank cycles, inspect agitator | Clumping, slow breakdown |
Seasonal checks on gaskets, hose clamps, and vent seals prevent leaks that reduce suction. Regular attention keeps systems running odor-free and extends time between full emptying.
Maintenance, Emptying, And Safe Handling
Routine checks and careful emptying are the simplest ways to keep on-site sanitation working well.
Emptying Frequency For Solids And Urine
For two people, expect solids to need emptying about once per month. Urine containers typically require service every other day.
Note: Nature’s Head disallows liners; Separett permits compostable bags in the solids bin. Follow the manufacturer schedule to avoid overfilling and odors.
Cleaning, Compost Finishing, And Disposal Options
Use mild cleaners or diluted vinegar and warm water. Avoid bleach and harsh solvents that harm the system’s microbes and seals.
Self-contained units may partially stabilize material, but final composting often needs an outdoor pile to finish. Many makers advise against using finished compost on vegetable beds; apply it to ornamentals or trees instead.

- Inspect solids chamber, agitator, and seals monthly.
- Shut fans if directed, remove bins or liners, and seal bags where allowed before transport.
- Stock peat moss or sawdust near the unit and add a scoop after each solid use for consistent odor control.
- Wear gloves, practice hand hygiene, and label stored waste for safety.
“Safe handling and predictable service times make these systems easy to live with and maintain.”
Climate And Mobility Considerations
When temperatures drop, the biological process that stabilizes solids slows and odors can increase.
Cold‑Weather Performance And 55°F Thresholds
Microbial activity falls off below about 55°F. At lower temperatures, composting slows and solids may need emptying more often.
Insulate vent runs, keep the fan running, and add extra bulking material to help control moisture and smell. In long freezes, transfer solids to an external compost pile to finish when warm weather returns.
RV, Boat, And Tiny House On Wheels Use
Mobile setups need vibration‑resistant mounts, spill‑proof urine tanks, and secure lids to prevent leaks while moving.
Choose 12V models or non‑electric options based on power budget. A 12V fan tied to batteries or solar keeps negative pressure and reduces odor. Non‑electric systems work for strict off‑grid days but may raise service time.
- Travel prep: empty urine tanks, lock lids, and check vent fittings before transit.
- Durability: favor brands known for rugged parts and easy service access, such as Nature’s Head for mobile use.
“Plan for cold and motion up front; simple steps cut cleanout time and keep systems reliable.”
Costs, Budget, And Total Cost Of Ownership
A clear budget plan helps owners weigh upfront purchase prices against years of operating savings.
Upfront Prices: Separett, Nature’s Head, And Biogas Systems
Popular models range in price. Separett Villa often sells for about $989–$1,400. Nature’s Head lists near $995. HomeBioGas kits that include a digester and toilet components run around $1,455.

Operating Costs: Electricity, Bulking Materials, And Parts
Ongoing expenses are modest. A Separett fan can draw roughly 17W if it uses AC and may run continuously. That adds only a few dollars per month on a typical grid or solar system.
Bulking materials such as peat moss, sawdust, or coconut coir are recurring purchases. Minor replacements — gaskets, vent hoses, and seals — occur over years, not months.
Value Over Time
Composting systems cut water use and can avoid the high cost of a septic system, sewer hookups, or pump-outs. Over several years, reduced water bills and fewer clog repairs often offset the initial outlay.
“Track purchase price, consumables, power use, and any permit costs to understand the real total cost of ownership.”
| Option | Typical Upfront | Annual Ops |
|---|---|---|
| Separett Villa | $989–$1,400 | Low (fan + bulking) |
| Nature’s Head | ≈$995 | Low (bulking, occasional parts) |
| Biogas System | ≈$1,455 | Medium (maintenance + feedstock) |
Practical Tip: Add a small contingency for parts and factor in any local code compliance costs to avoid surprises at install time.
Codes, Zoning, And Compliance In The United States
A concise permit package can turn a skeptical inspector into an ally during a sanitation review.
Building and zoning rules vary widely by county and state. There is no single national standard for on-site sanitation. Early outreach to local officials saves time and reduces unexpected costs.
Permits, Certifications, And How To Talk To Officials
Gather manuals, vent diagrams, and any NSF or manufacturer certifications before a meeting. Provide clear photos of the proposed installation and a simple operations plan.
Tips:
- Ask which permit triggers apply and whether urine diversion or greywater routing matters.
- Explain odor control, routine maintenance, and how waste is contained to protect public health.
- Offer references or third-party test reports if officials are unfamiliar with the product.
When An External Compost Pile Is Required
Some units do not finish decomposition inside the unit. In those cases an external compost area completes processing and reduces sewage risk.
Follow local siting and containment rules. Keep piles away from water sources and public paths. Describe how long material will cure and who will manage it.
| Issue | What Officials Ask | What To Provide |
|---|---|---|
| Permit Trigger | New build vs retrofit | Site plan, unit spec sheet |
| Sanitation Proof | Pathogen control & odors | Certifications, venting diagrams |
| External Compost | Siting & containment | Compost plan, curing time |
Prepare a neighbor-friendly maintenance plan and link technical resources when helpful, for example a list of common top construction mistakes to avoid during install. Clear documentation often eases approvals and lowers long-term cost and time spent on compliance.
How To Choose The Right Model For Your Tiny Home
Model selection depends less on brand names and more on use patterns, climate, and available space.
People should weigh lifestyle first. Full‑time residents need larger solids capacity and easier emptying. Weekend users can pick smaller bins and accept more frequent service.
Location matters. Cold climates reduce biological activity and may favor systems with active mixing or external finishing. Mobile setups require vibration‑proof mounts and spill‑safe urine tanks.
Community feedback often highlights real experience. Many owners praise Separett for near‑odor performance when the fan runs continuously. Nature’s Head earns marks for reliability after users tune bulking ratios. DIY bucket systems remain attractive for low upfront cost.
Lifestyle, Location, And Community Insights
- Assess use: full time vs. weekend, number of people, and tolerance for routine maintenance.
- Check space: vent run length, access for bin removal, and whether an external compost area is viable.
- Consider power: 12V fans suit off‑grid setups; stationary homes may opt for biogas if they want fuel output.
- Tap communities: forums, Facebook groups, and tiny home classes reveal parts availability and real‑world issues.
| Factor | What To Look For | Practical Outcome |
|---|---|---|
| Occupancy | Daily users and peak use times | Choose larger solids chamber or more frequent servicing |
| Climate | Cold vs warm, humidity control | Select models with active mixing or plan external finishing |
| Mobility | Mounting, spill protection, power type | Pick rugged designs and 12V fans for mobile use |
| Budget & Codes | Upfront cost, operating supplies, local rules | Narrow to compliant, affordable options with service support |
Final step: create a simple checklist with budget, capacity needs, power availability, and permit limits. Then compare models side‑by‑side and consult owner groups to validate choice before purchase.
Conclusion
Selecting the right system means matching capacity, power, and mobility to daily needs. Separett, Nature’s Head, bucket systems, and biogas options fit different budgets and lifestyles.
Success hinges on three proven features: separation of liquids, steady venting with negative pressure, and regular addition of carbon bulking material. These keep odor low and speed stabilization.
Modern composting solutions provide a practical way to manage human waste without sewer or septic connections. They save water, cut infrastructure costs, and let owners close the loop with responsible compost handling.
Next steps: finalize design choices, confirm local code requirements, and prepare an installation checklist so the project moves from planning to first use with minimal surprises.
FAQ
What is a composting system and how does it differ from a traditional flush toilet?
A composting system separates or treats human waste without relying on large volumes of water. Instead of sending sewage to a septic tank or municipal sewer, it uses biological breakdown, evaporation, aeration, and bulking materials to stabilize solids. Many models separate liquids from solids to reduce volume and odor, while others use mixing or heat. This contrasts with flush toilets that require continuous water and sewer or septic infrastructure.
Who should consider a composting solution for a small dwelling?
People living in compact homes, off-grid properties, RVs, or boats often choose these systems. They suit homeowners who want to reduce water use, avoid costly septic installs, or live where sewer hookups are unavailable. Users comfortable with basic maintenance and occasional emptying will adapt best.
Are there well-known brands and models suited for limited-space living?
Yes. Separett offers urine-diverting units with low-power fans and low odor. Nature’s Head provides a popular self-contained model with an agitator and reliable venting. DIY bucket systems remain a low-cost option when used with proper cover material like sawdust or coconut coir.
How often must solids and liquids be emptied?
Emptying frequency depends on household size, model, and use. Self-contained units typically need solids emptied every few weeks to several months. Urine containers may require emptying more frequently—often weekly or as needed. Systems with separate urine diversion dramatically lower solid volume and odor, extending intervals between emptying.
What bulking materials work best to manage moisture and odor?
Peat moss, sawdust, and coconut coir are common choices. These materials absorb moisture, create air gaps for aerobic decomposition, and mask odors. Users should add a scoop after each solid deposit and monitor moisture to keep the pile crumbly rather than wet.
Do these toilets produce usable compost or fertilizer?
Properly finished human-derived compost can be safe for nonfood uses if processed to recommended temperatures and timeframes. Many jurisdictions restrict use on food crops. For garden safe use, compost must age and cure fully or be processed in a hot compost system or biogas digester according to local guidelines.
What maintenance tasks are required to keep a unit odor‑free?
Regular tasks include adding bulking material, emptying containers on schedule, ensuring the vent fan runs correctly, and keeping urine lines clear. Good ventilation and maintaining a dry balance prevent anaerobic conditions that cause odors. Periodic cleaning of surfaces with mild cleaners helps hygiene.
How much power do electric fans and agitators typically use?
Most fans run on 12‑volt DC systems and draw very little current—often under a few watts. Agitators and larger components may require more power but remain modest compared with household appliances. This makes them compatible with small solar setups or battery systems in mobile dwellings.
Can these systems work in cold climates or on mobile platforms?
Yes, with planning. Insulating the holding area, routing vents to prevent freezing, and locating the unit inside a heated space help performance. For vehicles and boats, secure mounting, odor-proof venting, and attention to liquid storage prevent leaks and smells while in motion.
What are the typical upfront and operating costs?
Upfront costs range from very low for DIY bucket setups to several hundred or over a thousand dollars for manufactured units like Separett or Nature’s Head. Operating expenses include bulking material, occasional parts, and minimal electricity. Total cost of ownership is often lower than septic installation or ongoing sewer fees.
Are there legal or code considerations in the United States?
Yes. Regulations vary by state and county. Some jurisdictions recognize certified urine‑diverting or composting systems; others require permits or an external compost pile. Homeowners should consult local health departments and building officials before installation to ensure compliance.
How should someone choose the right model for their lifestyle?
Evaluate household size, mobility, climate, available space, and tolerance for maintenance. Urine separation reduces odor and volume for small households. Self-contained units work well in compact interiors; centralized or outdoor composting suits properties with land. Budget and local codes will also guide the choice.
What safety steps are essential when emptying and handling waste?
Wear gloves, avoid breathing dust, and wash hands thoroughly after handling. Use sealed containers for transport and follow local rules for disposal or composting. Allow finished material to cure long enough to reduce pathogen risk before applying to soil, and avoid using it on edible crops unless regulations permit.
Can waste be converted to energy with a biogas setup?
Yes. Anaerobic digesters can convert organic waste into methane for cooking or heating. Biogas systems require careful design, consistent feedstock, and attention to safety and local regulations. They represent an advanced option for off‑grid households seeking energy recovery rather than traditional composting.